netcup Beginner's Buying & Setup Guide: From 0% VAT Ordering to SSH Login
- Automatic 0% VAT: Non-EU buyers (US, UK, CA, AU, SG, CH) and EU businesses with a valid VAT ID (Reverse Charge) automatically pay 0% VAT net prices (saving ~19%)
- Anti-Fraud Rule: Order directly from your real residential IP without a VPN or proxy so your IP country matches your billing address for instant no-KYC approval
- Voucher Cart Tip: Product-specific free-month vouchers may add a discounted item to your cart—always check and remove any duplicate un-discounted item before checkout
- Dual-Panel Architecture: CCP manages invoices, contracts, and cancellations; SCP (SCP Manual) manages power, OS images, snapshots, and VNC with separate credentials
- 31-Day Cancellation Window: All contracts auto-renew unless cancelled in CCP at least 31 days before the current billing period ends
Table of Contents19 sections
Many developers and sysadmins ordering from netcup (one of Germany's most respected hosting providers) for the first time expect a typical hourly cloud console like AWS, DigitalOcean, or Hetzner Cloud. Because netcup operates on traditional German contract and invoice workflows, first-time buyers often run into avoidable issues: paying 19% VAT unnecessarily, duplicating items in the cart when redeeming vouchers, wondering where to pay the invoice, mixing up CCP and SCP passwords, or missing the 31-day cancellation deadline.
This step-by-step guide walks you through the entire lifecycle: pre-order network checks, choosing a server and datacenter, redeeming voucher codes cleanly, unlocking automatic 0% VAT, receiving your CCP credentials without KYC delays, paying invoices in EUR, managing your server in SCP (SCP Guide), connecting via SSH, and avoiding auto-renewal pitfalls (see our EN/DE Hosting Glossary for German billing terms and Community Reviews for real-world feedback).
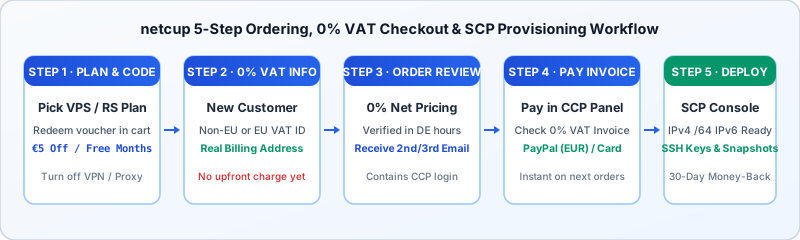
Essential Rules: 4 Things You Must Know Before Ordering#
Before placing your first order, take two minutes to understand how netcup's platform works:
1. You cannot register an empty account: netcup does not have a standalone "Sign Up" page. New customer accounts are created during the checkout process when you order your first product.
2. Strict IP vs. billing address anti-fraud checks: Never use a VPN, proxy, or datacenter IP when placing your order! Your connection IP must match the country of your residential billing address. Ordering from a German VPN while entering a US or UK address will trigger manual fraud review or incorrect VAT calculation.
3. CCP and SCP are two separate control panels: The Customer Control Panel (CCP) handles invoices, payment methods, contracts, and cancellations. The Server Control Panel (SCP) handles server power, OS reinstallations, snapshots, VNC console, and rDNS. Each panel has its own independent password sent in separate emails.
4. Contracts auto-renew with a mandatory 31-day notice period: Every netcup server contract renews automatically at the end of its billing cycle. If you do not wish to renew, you must submit a cancellation in CCP at least 31 days before the current period ends.
Step 1: Pre-Order Checklist & Network Preparation#
Before opening the netcup website, verify the following three items:
- Turn off all VPNs and proxies: Make sure your browser connects directly through your home or office ISP so netcup detects your true country IP.
- Prepare your payment method:
- Recommended: PayPal or an international Credit / Debit Card (Visa or MasterCard with 3D Secure enabled).
- Pro Tip for non-EUR buyers: Invoices are billed in Euros (
EUR). When paying via PayPal or card, always choose to be charged in EUR and let your card issuer handle currency conversion (especially with zero-FX cards like Wise, Revolut, Capital One, or Monzo) rather than using PayPal's built-in currency conversion.
- Use an accurate street address: Prepare your real residential or business street address including a specific building or house number and valid postal/ZIP code.
Step 2: Choose Your Server Line, Datacenter & Contract Term#
Visit the official netcup store and select the server line that fits your workload (you can also compare specs in our Product Overview or run the interactive VPS Chooser):
- VPS Series (Shared vCore): Powered by AMD EPYC processors, DDR5 ECC RAM, and enterprise SSD RAID10 (or NVMe on ARM64 plans). Ideal for web hosting, Docker stacks, CI/CD runners, reverse proxies, and development environments. Best-value starters: VPS 500 G12.5 or VPS 1000 G12.5.
- Root Server Series (Dedicated Physical Cores): Full KVM virtualization with 100% dedicated AMD EPYC Zen4/Zen5 CPU cores and high-IOPS NVMe storage. Built for production databases, high-traffic web apps, game servers, compilation, and sustained 24/7 CPU workloads. Best-value sweet spot: RS 1000 G12.5.
- Key Configuration Options:
- Datacenter Location:
- Nuremberg (Germany) & Vienna (Austria) & Amsterdam (Netherlands): Best for Europe and the UK (5–20 ms latency). Nuremberg is netcup's flagship primary facility.
- Manassas, Virginia (US-East): Best for North & South America (10–65 ms across the US and eastern Canada).
- Singapore: Best for Southeast Asia, East Asia, and Australia/Oceania (see our Datacenter Speedtest & Looking Glass Guide to test routes from your ISP first).
- Contract Period: Choose between 1 month (maximum flexibility), 12 months (~13% monthly discount), or 24 months (~26% monthly discount).
- Datacenter Location:
Click Order now to add your chosen configuration to the shopping cart.
Step 3: Redeem Vouchers Cleanly & Unlock Automatic 0% VAT#
Inside the Shopping Cart (Checkout), review your items and apply a voucher code before proceeding:
- Locate the Voucher / Gutscheincode input field in the cart;
- Visit our Live Verified Coupons Page and copy a matching voucher code:
- €5.00 New Customer Discount Voucher: Instant €5.00 credit off your first invoice on almost any product;
- Free Month Product Vouchers: Waives 1 or 2 months of base fees on specific plans (e.g., 2 months free on RS 1000 G12.5);
- 30% Lifetime Webhosting Vouchers: Permanent 30% recurring discount on Webhosting 2000/4000/8000 plans;
- Paste the code and click Redeem.
Crucial Cart Check: Avoid Duplicate Items When Redeeming Product Vouchers!
If you first added a server (e.g., RS 1000 G12.5) to your cart and then redeemed a model-specific free-month voucher, netcup's cart system may automatically insert a second RS 1000 entry with the voucher discount attached. Always inspect the item quantity in your cart: if you see two servers listed, delete the un-discounted item and keep only the entry showing the voucher discount!
How Automatic 0% VAT Works for International & Business Buyers:
netcup calculates Value Added Tax (VAT) strictly based on your Billing Address Country and tax status:
- Non-EU Countries (United States, United Kingdom, Canada, Australia, Singapore, Switzerland, Japan, etc.): The system automatically applies 0% VAT net pricing—saving you 19% compared to German gross prices, with zero paperwork required.
- EU Businesses Outside Germany (EU Reverse Charge): Select Business / Company during registration and enter your valid EU VAT ID (VIES-validated). Your invoice will automatically switch to 0% VAT under the EU Reverse Charge mechanism.
- EU Private Individuals & German Customers: Billed at the statutory VAT rate of your EU country of residence (e.g., 19% in Germany, 20% in Austria, 21% in the Netherlands/Spain).
Note: While browsing the store before logging in, netcup may display prices including 19% German VAT by default. As soon as you select a non-EU country in Step 4, the Final Order Summary will recalculate your total to 0.00% Tax (Net Price).
Once your cart shows the right configuration and voucher discount, click Continue to order.
Step 4: Fill Out Your Customer Profile for Instant Automated Approval#
Select Register new account and complete the registration form using standard Latin characters (A–Z, 0–9):
| Form Field | Best Practice & Formatting Rule | Example |
|---|---|---|
| Customer Type | Choose Private individual (or Organisation / Company only if entering a valid business registration / EU VAT ID) | Private individual |
| First Name | Your legal first name matching your payment method | Alex |
| Last Name | Your legal surname matching your payment method | Miller |
| Street and house number | Critical: Include both your street name and specific building/house number | 742 Evergreen Terrace |
| Postal Code | Valid ZIP or postal code matching your city | 10001 |
| City | Your city or town name | New York |
| Country | Critical: Select your true country of residence (matching your current IP and payment method) | United States / United Kingdom |
| E-Mail Address | Reliable primary email address (Gmail, Outlook, ProtonMail, or corporate domain) | [email protected] |
| Phone Number | Valid mobile number in international format with country code | +12125550199 |
Click Save address to proceed to the final Order Summary page.
On the Summary page, verify:
- Tax Rate: Confirmed as 0.00% (for non-EU countries or valid EU Reverse Charge VAT IDs) or your local EU VAT rate;
- Total Amount: Reflects the net price minus your redeemed voucher.
Check the Terms & Conditions boxes and click Order at charge to submit your order.
Step 5: Receive Your CCP Credentials & Invoice (Instant Automated Setup)#
Streamlined Onboarding: Instant Account Creation Without Webcam KYC!
Older forum posts sometimes mention mandatory webcam identity verification or upfront prepayment delays. For orders placed cleanly from a residential IP that matches your billing address, netcup's automated system provisions your customer account immediately without manual ID uploads or webcam checks.
You ordering on invoice (Post-Checkout Invoice): you submit the order first, receive your CCP login and invoice via email, and then pay inside the panel.
Check your email inbox (and your Spam / Junk folder just in case). Within 2 to 5 minutes, you will receive three emails:
- Order Confirmation (
Order Confirmation / IHR AUFTRAG): Confirms your order number and selected server specifications; - CCP Login Credentials (
Your login credentials for the netcup CCP):- Contains your numeric Customer Number (e.g.,
123456); - Contains your auto-generated Initial Password for the Customer Control Panel;
- Contains your numeric Customer Number (e.g.,
- Invoice Email (
Your Invoice from netcup): Includes the PDF invoice for your first billing cycle.
Step 6: Log Into CCP and Pay Your First Invoice#
Now that you have your CCP credentials, log in to pay your open invoice and trigger automatic server deployment:
1. Log Into the Customer Control Panel (CCP)#
- Open https://www.customercontrolpanel.de;
- Enter your Customer Number and Initial Password from the email;
- Enter the one-time Email 2FA security code sent to your inbox;
- If prompted on first login, accept the standard Data Processing Agreement to access the main dashboard.
2. Pay the Open Invoice#
- In the left navigation menu of CCP, click Invoices (
Rechnungen); - Locate your newly generated invoice under Outstanding / Unpaid Invoices;
- Click the Pay now icon next to the invoice and choose your payment method:
- PayPal: Instant confirmation, triggers server provisioning immediately;
- Credit / Debit Card: Visa, MasterCard, or American Express via 3D Secure.
Save 3%–5% on Foreign Exchange Fees:
If your bank account or card is in USD, GBP, CAD, AUD, or SGD, PayPal will offer to convert the EUR invoice using PayPal's own exchange rate. Always change the currency option in PayPal checkout to pay in the merchant's currency (EUR) and let your card issuer handle the conversion—PayPal's conversion spread typically adds a 3.5%–4.5% markup over the mid-market rate.
Once payment completes, the invoice status in CCP immediately changes to Paid.
Step 7: Receive Your SCP Credentials & Server IP (Automated Provisioning)#
As soon as your first invoice is marked Paid, netcup's provisioning system allocates your KVM instance, configures networking, and installs the default Linux image.
Within 5 to 15 minutes, you will receive two more emails:
Access data for SCP: Contains the login URL and dedicated password for the Server Control Panel (SCP);- Server Delivery Confirmation: Contains your public IPv4 address, IPv6
/64subnet, hostname, and initial root password.
Quick Reference: CCP vs. SCP Responsibilities#
| Control Panel | Official URL | Primary Responsibilities | Login Credentials |
|---|---|---|---|
| CCP (Customer Control Panel) | customercontrolpanel.de | Billing, invoices, payment methods, support tickets, contract upgrades, 31-day cancellations | Customer Number + CCP Password |
| SCP (Server Control Panel) | servercontrolpanel.de | Power cycle/reboot, OS reinstall, custom ISO mount, snapshots, HTML5 VNC console, rDNS (PTR) | Customer Number + Separate SCP Password |
Shortcut: While logged into CCP, open Products -> select your server -> click Auto-Login SCP to jump directly into the SCP dashboard without typing a second password.
Step 8: First SSH Connection & Initial Server Hardening#
With your IPv4 address and initial root password in hand, connect to your new server from your local terminal.
1. Connect via SSH#
Open your built-in terminal (Windows Terminal / PowerShell on Windows 10/11, or Terminal on macOS and Linux) and run:
ssh [email protected](Replace 203.0.113.10 with your actual server IPv4 address.)
- Type
yesand press Enter when prompted to trust the server's ED25519/RSA host key fingerprint; - Paste the initial
rootpassword from your email (Right-ClickorCtrl+Shift+Vin Windows Terminal) and press Enter; - Note: Linux terminals intentionally hide password characters (no asterisks or cursor movement) while typing or pasting. Just paste once and hit Enter.
2. Three Recommended First Actions After Login#
(1) Change the default root password immediately
passwdEnter a strong custom password twice (or better yet, set up SSH Ed25519 key authentication).
(2) Update system repositories and installed packages
apt update && apt upgrade -y(3) Verify or enable Linux TCP BBR congestion control
Modern Debian/Ubuntu kernels include Google's BBR congestion control, which significantly improves throughput across transatlantic and transcontinental links:
# Append BBR configuration to sysctl
echo "net.core.default_qdisc=fq" >> /etc/sysctl.conf
echo "net.ipv4.tcp_congestion_control=bbr" >> /etc/sysctl.conf

# Apply changes immediately
sysctl -p

# Verify BBR is active (output should include 'bbr')
sysctl net.ipv4.tcp_congestion_control
For full production hardening (SSH keys, UFW firewall, and Fail2ban), follow our VPS Security Hardening Checklist. To install a clean OS image or custom ISO, read our Clean OS Reinstall & Custom ISO Guide.
Step 9: Contract Cancellation (31-Day Notice) & 30-Day Money-Back Guarantee#
German hosting contracts treat server subscriptions as formal service agreements rather than disposable prepaid instances. Keep these two rules in mind to protect your wallet:
1. The 31-Day Cancellation Notice Rule (Kündigung)#
- All netcup contracts auto-renew by default for another billing term unless explicitly cancelled;
- To stop renewal, you must submit a cancellation in CCP at least 31 days before the current contract period expires;
- How to cancel in CCP:
- Log into CCP;
- Click Contracts (
Verträge) in the left sidebar; - Select the server you want to cancel and click Cancel (
Kündigung); - Choose End of contract term as the effective date and confirm;
- Save your cancellation confirmation email.
- Never simply abandon an unwanted server without cancelling in CCP—unpaid renewal invoices will accumulate late payment reminders (
Mahnung). See our Refund, Cancellation & Renewal Guide for full details.
2. 30-Day Money-Back Guarantee for New Customers#
- netcup offers a 30-day satisfaction money-back guarantee on standard products for new customers;
- If the server's hardware or network routing does not meet your needs within the first 30 days, open a support request under Help / Support in CCP citing the 30-day money-back guarantee to terminate the contract and receive a refund to your original payment method.
Troubleshooting & Frequently Asked Questions#
Q1: Why does the website show 19% VAT while browsing, and how do I get 0% VAT?
VAT is finalized based on the Country selected in your billing address during checkout.
Before you log in or enter an address, the storefront shows default German gross prices (including 19% VAT). Once you select a non-EU country (such as the United States, United Kingdom, Canada, Australia, or Singapore) in Step 4—or enter a valid non-German EU business VAT ID—the Order Summary page automatically removes the 19% tax and bills you at 0.00% VAT net pricing.
Q2: Why did two servers appear in my shopping cart after I entered a voucher code?
Model-specific free-month vouchers (such as RS 1000 or VPS 1000 free-month codes) work by automatically adding the discounted product directly into your shopping cart. If you had already clicked "Order now" on the product page beforehand, you will end up with two servers in your cart—one at full price and one with the voucher discount. Simply click the trash/delete icon next to the un-discounted item before checking out.
Q3: Do I need to complete webcam KYC or upload a passport after ordering?
No, not when ordering cleanly without a VPN.
As long as you place your order from a standard residential ISP connection whose country matches your billing address and payment method, netcup's automated verification approves your account in minutes without webcam checks or document uploads.
Q4: Why isn't my CCP password working on the SCP panel?
CCP (customercontrolpanel.de) and SCP (servercontrolpanel.de) use completely separate credentials. Check your inbox for the email titled "Access data for SCP" for your SCP password, or click the Auto-Login SCP button inside CCP's product view.
Q5: Nothing happens on screen when I type or paste my password in SSH. Is it frozen?
No—this is standard Linux/OpenSSH security behavior. The terminal hides all characters (including asterisks) while entering a password. Paste your password once and press Enter to log in.
Next Steps After Provisioning#
Now that your server is up and running, explore these practical guides:
- Complete SCP Control Panel Manual: Mount custom ISOs, use the HTML5 VNC rescue console, export
.raw.zstsnapshots, and configure rDNS; - VPS Security Hardening Checklist: Configure Ed25519 SSH keys, disable root password logins, and set up UFW + Fail2ban;
- VPS Benchmark & Hardware Verification Guide: Test your CPU single-core/multi-core speeds and NVMe IOPS with YABS and Geekbench 6;
- 12 Practical Self-Hosting Use Cases for a netcup VPS: Deploy Docker stacks, reverse proxies, private cloud storage, and monitoring tools.